

Schools are advised to use Assignments rather than Quizzes to support online examinations. The use of any real time quizzing system should be avoided as it relies on students having bandwidth and equipment to submit in a short time-frame, which really puts concentrated pressure on the system.
![]() By following the important steps outlined further below you will minimise the risk of any problems with student submissions or with students accessing the assignment ahead of the scheduled exam date.
By following the important steps outlined further below you will minimise the risk of any problems with student submissions or with students accessing the assignment ahead of the scheduled exam date.
![]() Anonymous Grading: The QUB Handbook of Assessment Guidance and Support requires Anonymous Marking for assessment, where possible. The way in which Canvas applies fully anonymous grading means that schools may have difficulty when it comes to identifying students with exceptional circumstances or late submissions. This is an issue common across all UK Universities who are currently using anonymous marking functionality in Canvas. Link to information on key considerations when using Anonymous grading in Canvas.
Anonymous Grading: The QUB Handbook of Assessment Guidance and Support requires Anonymous Marking for assessment, where possible. The way in which Canvas applies fully anonymous grading means that schools may have difficulty when it comes to identifying students with exceptional circumstances or late submissions. This is an issue common across all UK Universities who are currently using anonymous marking functionality in Canvas. Link to information on key considerations when using Anonymous grading in Canvas.
![]() Use of Turnitin – The system supplier (Turnitin) are experiencing ongoing issues resulting in a poor student and academic experience. As a result, Schools are advised NOT to use Turnitin for online examinations at this time (i.e. exams with less than 24h duration, see options 1 and 2 as described on previous page). The Canvas Team continue to monitor the response of the Turnitin supplier to these issues, but there is the potential for these to impact Turnitin assignments within Canvas. See latest guidance on use of Turnitin:
Use of Turnitin – The system supplier (Turnitin) are experiencing ongoing issues resulting in a poor student and academic experience. As a result, Schools are advised NOT to use Turnitin for online examinations at this time (i.e. exams with less than 24h duration, see options 1 and 2 as described on previous page). The Canvas Team continue to monitor the response of the Turnitin supplier to these issues, but there is the potential for these to impact Turnitin assignments within Canvas. See latest guidance on use of Turnitin: ![]() Turnitin within Canvas: Staff Guide
Turnitin within Canvas: Staff Guide
![]() Use Assignments rather than Quizzes – The use of any real time quizzing system should be avoided during formal examination periods, as it relies on students having bandwidth and equipment to submit in a short time-frame, which really puts concentrated pressure on the system. In this current situation, schools are advised NOT to use Canvas Quizzes for online examination.
Use Assignments rather than Quizzes – The use of any real time quizzing system should be avoided during formal examination periods, as it relies on students having bandwidth and equipment to submit in a short time-frame, which really puts concentrated pressure on the system. In this current situation, schools are advised NOT to use Canvas Quizzes for online examination.
![]() School based decision to support local contexts – There are different options to consider with assignment settings to suit local contexts. Schools need to take firm decisions on approach and communicate effectively to staff. For example, a school decision around setting of the assignment ‘until date’ or decisions around avoiding use of rubrics in cases where multiple graders are involved in the marking process etc. needs to be agreed.
School based decision to support local contexts – There are different options to consider with assignment settings to suit local contexts. Schools need to take firm decisions on approach and communicate effectively to staff. For example, a school decision around setting of the assignment ‘until date’ or decisions around avoiding use of rubrics in cases where multiple graders are involved in the marking process etc. needs to be agreed.
![]() Use of 3rd Party Tools/Apps – During previous examination periods, a number of students encountered difficulty when using unsupported 3rd party tools such as Microsoft LENS. It is recommended to only use tools supported by the University. If Schools do have a requirement to use unsupported tools, provide clear guidance to students on how to use and instruction on alternative submission options should they encounter any issues submitting via Canvas.
Use of 3rd Party Tools/Apps – During previous examination periods, a number of students encountered difficulty when using unsupported 3rd party tools such as Microsoft LENS. It is recommended to only use tools supported by the University. If Schools do have a requirement to use unsupported tools, provide clear guidance to students on how to use and instruction on alternative submission options should they encounter any issues submitting via Canvas.
![]() Consider all eventualities – Schools should stagger start times of online exams across the Faculty, to smooth online assessment peaks in the system. For time bound assessment, consider a mock test so that students are comfortable with the process. Have a Plan B in place for submission, e.g. use of email to submit files.
Consider all eventualities – Schools should stagger start times of online exams across the Faculty, to smooth online assessment peaks in the system. For time bound assessment, consider a mock test so that students are comfortable with the process. Have a Plan B in place for submission, e.g. use of email to submit files.
![]() There are a few steps that you should undertake prior to creating your assignment in Canvas to ensure the process is a seamless as possible and that you create them in a way that does not impact on any students currently enrolled in the course. To get started, watch the instructional video below or refer to the step-by-step guidance further below.
There are a few steps that you should undertake prior to creating your assignment in Canvas to ensure the process is a seamless as possible and that you create them in a way that does not impact on any students currently enrolled in the course. To get started, watch the instructional video below or refer to the step-by-step guidance further below.
VIDEO
![]() Link to video guidance for step by step instruction on how to Steps to Prepare
Link to video guidance for step by step instruction on how to Steps to Prepare
INSTRUCTIONAL TEXT
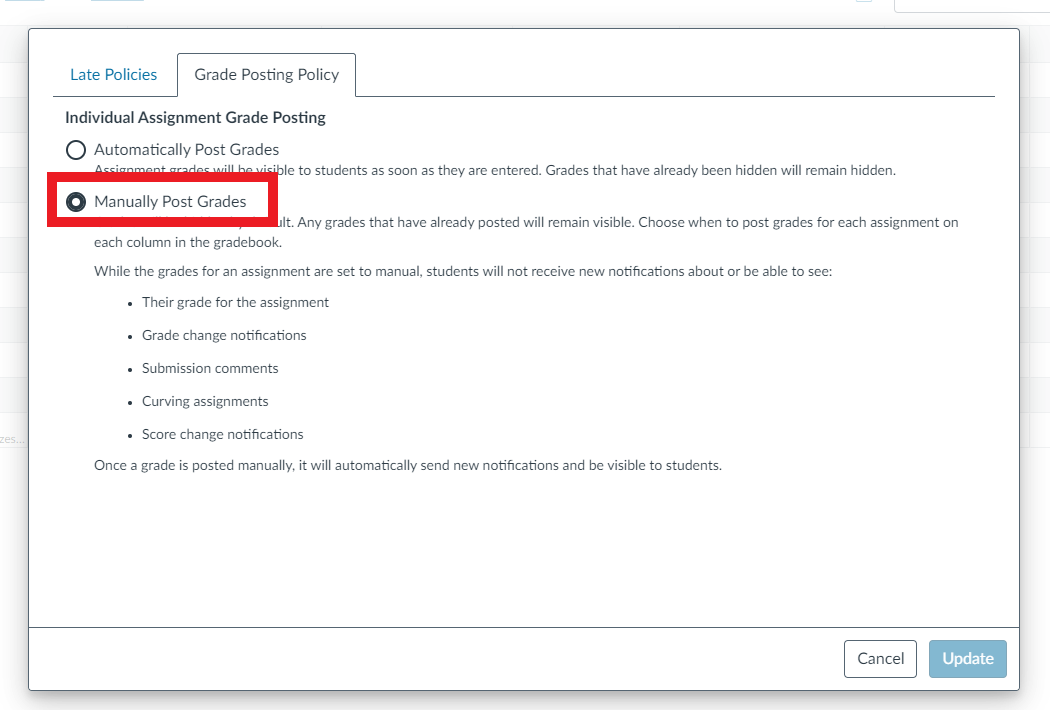
 Ensure that the Grade Posting Policy is set to ‘Manual’
The Grade Posting Policy is set to ‘Automatic’ by default. If this is not changed to ‘Manual’ then any grades that are input into Canvas will be released to students immediately. The steps to do this are as follows:
 Step 1: Go to ‘Grades’ within the course you are working on.
Step 2: Click on the ‘Settings Cog’ on the top right of your screen (see image below).

Step 3: Click the ‘Grade Posting Policy’ tab and ensure the radio button is set to ‘Manually Post Grades.’ (see image below).
Hide Running Grade Totals
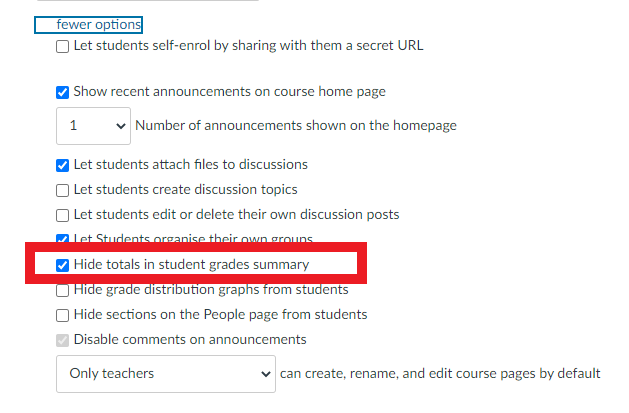
Canvas automatically provides the student with a running total based on assessment taken to date. To avoid potential confusion and anxiety we advise hiding this total. The steps to do this are as follows:
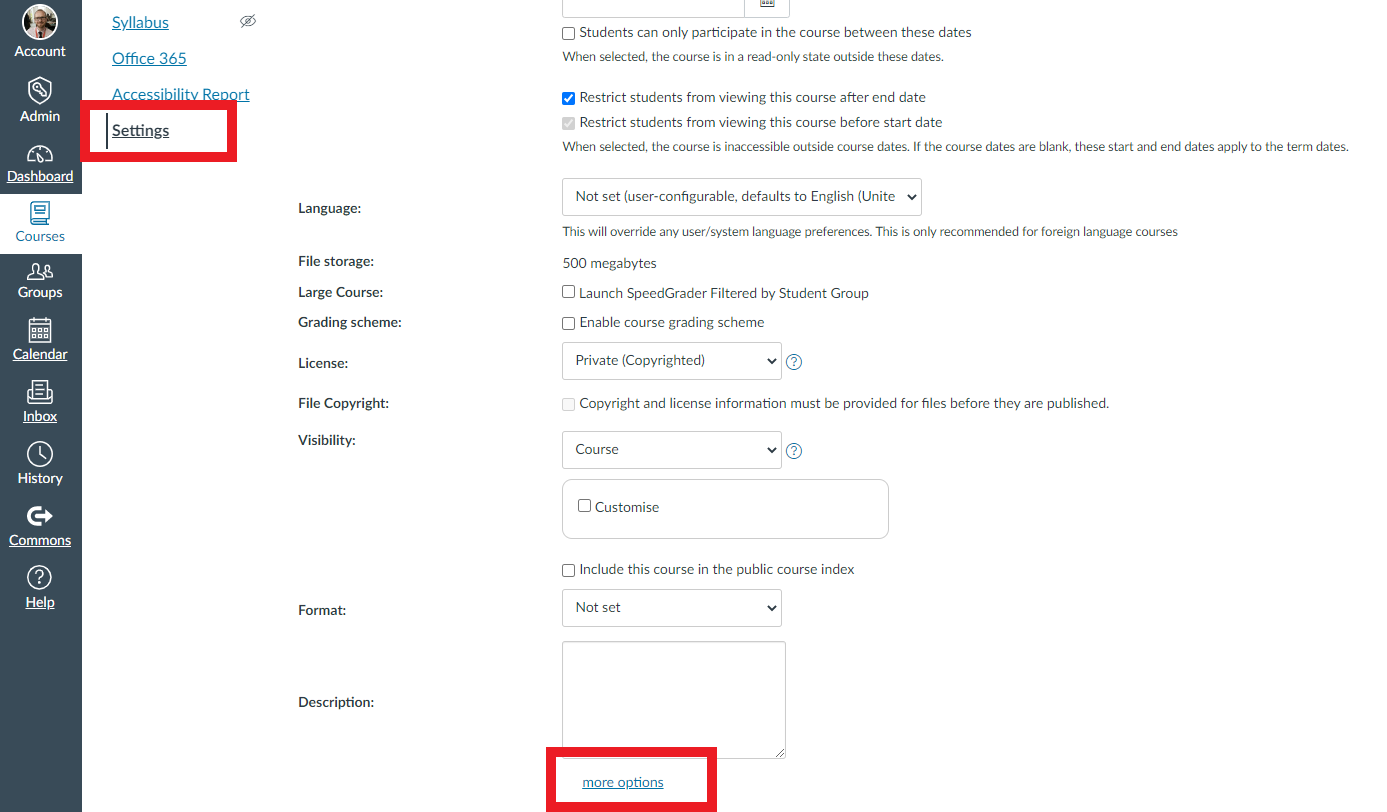
Step 1: Go to ‘Settings’ in the menu on the left of the course you are working on.
Step 2: Click the ‘Course Details’ tab and scroll to the bottom of the page to select ‘More Options’ (see image below).
Step 3: Tick the checkbox ‘Hide Totals in Student Grades Summary’ then ‘Update Course Details.’ (see image below).
Create an Assignment Group for your Exam / Class Test
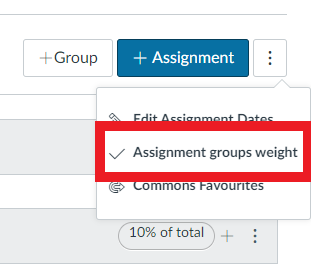
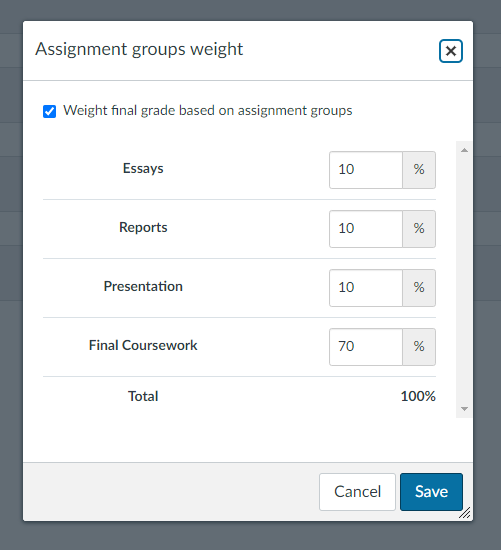
In order to weight your assignments as required, you will need to create an ‘Assignment Group’ for each one. You will then be able to weight the groups using the ‘Assignment Groups Weight’ function. The steps to do this are as follows:
Step 1: Go to ‘Assignments’ in the menu on the left of the course you are working on.
Step 2: In the top right of the screen select the ‘+Group’ button and give your assignment group a name in the pop-up (see image below).

Step 3: Once you have created an assignment group for each assignment click on the ellipsis beside ‘+Assignment’ and select ‘Assignment Groups Weight’ (see image below).
Step 4: Click in the box to ‘Weight final grade based on assignment groups’ and input the weighting for each assignment before saving (see image below).
![]() Before you upload the file for your Examination / Test, set it up using the steps below. Once this is done you can securely upload and link the file containing the instructions using the next part of the guidance. By following the steps below you will minimise the risk of any problems with student submissions or with students seeing the assessment ahead of the examination date.
Before you upload the file for your Examination / Test, set it up using the steps below. Once this is done you can securely upload and link the file containing the instructions using the next part of the guidance. By following the steps below you will minimise the risk of any problems with student submissions or with students seeing the assessment ahead of the examination date.
Watch the instructional video below or refer to the step-by-step guidance further below.
VIDEO
![]() Link to video guidance for step by step instruction on how to Set up Examination / Test
Link to video guidance for step by step instruction on how to Set up Examination / Test
INSTRUCTIONAL TEXT
Make the instructions clear and unambiguous
You should give instructions in a way that leaves no room for ambiguity and makes it clear exactly what students need to do.
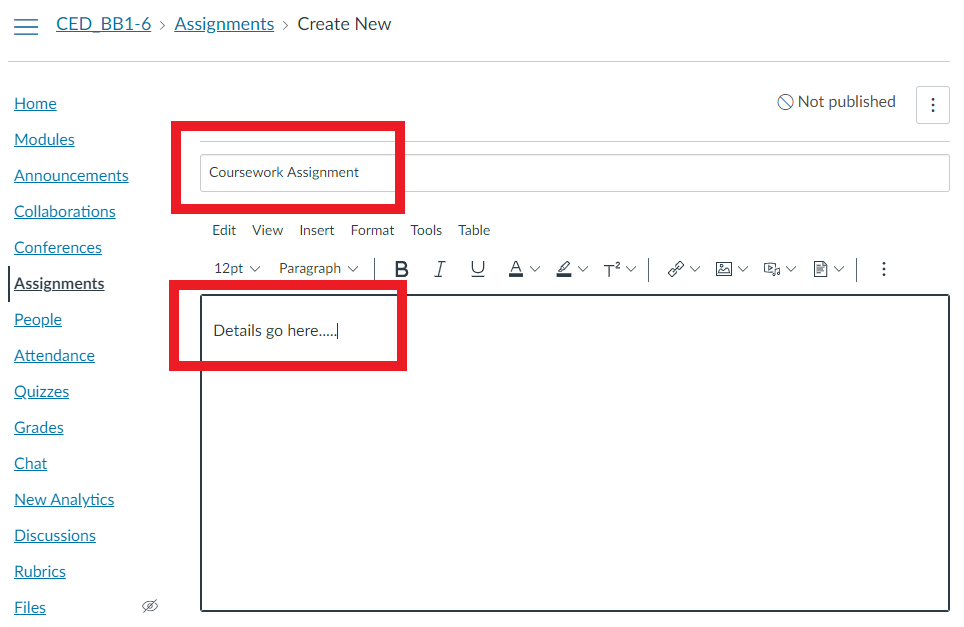
![]() Step 1: In your Canvas course, click on ‘Assignments.’ and then ‘+Assignment’ to start setting up your assignment.
Step 1: In your Canvas course, click on ‘Assignments.’ and then ‘+Assignment’ to start setting up your assignment.
![]() Step 2: Give your assignment a title and enter all the ‘instructions to students’ into the into the box (see image below).
Step 2: Give your assignment a title and enter all the ‘instructions to students’ into the into the box (see image below).
Note: The Canvas supplier advises that in order to maintain consistent formatting, it is recommended to advise students to submit files in pdf format, rather than doc. Different programs will read and display document formatting differently. Converting documents with complex formatting to PDF can help reduce the conversion errors because of the way PDF handles charts, images, equations and other formatting.
Follow the detailed set-up outlined in the assignment checklist
The checklist outlines the key settings that need to be considered when creating your assignment to ensure that there are no problems and that students will be able to submit without difficulty. Some of the main ones are outlined below.
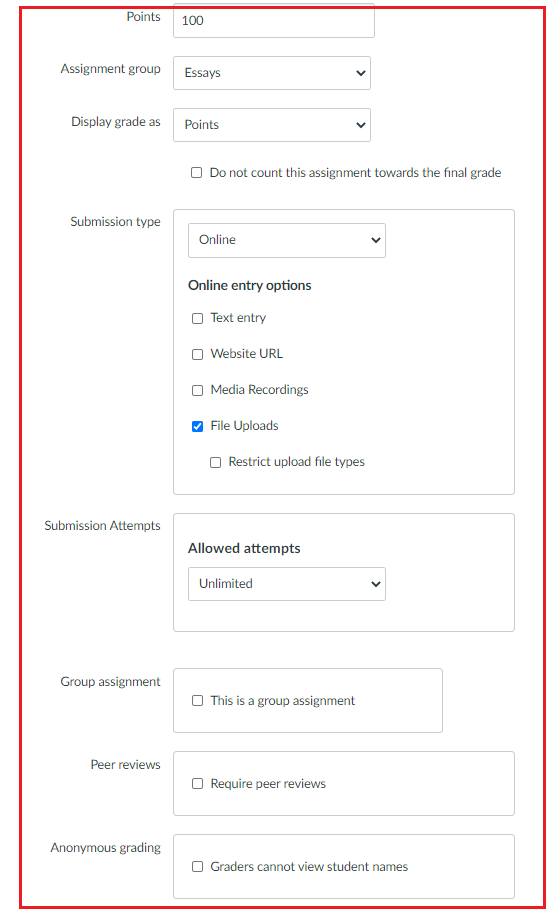
![]() Points: Set to 100
Points: Set to 100
![]() Assignment Group: Place your ‘Assignment’ into the new ‘Assignment Group’ you created earlier.
Assignment Group: Place your ‘Assignment’ into the new ‘Assignment Group’ you created earlier.
![]() Display Grade As: Set to ‘points.’
Display Grade As: Set to ‘points.’
![]() Submission Type: Set to ‘online and ‘file upload.’ (Note: Turnitin assignments are NOT recommended)
Submission Type: Set to ‘online and ‘file upload.’ (Note: Turnitin assignments are NOT recommended)
![]() Group Assignments & Peer Reviews: Only tick these options if this applies to your assignment.
Group Assignments & Peer Reviews: Only tick these options if this applies to your assignment.
 Anonymous Grading: The process of anonymous grading in Canvas raises potential issues such as; problems in the identification of students with exceptional circumstances, late submissions and feedback to all students. This may impact on the student experience and schools are advised to be aware of this.
Anonymous Instructor Annotations: Only tick this option if this applies to your assignment.
Check the ‘available from’ and the ‘available to’ dates/times are set before publishing
To ensure that students do not see the assignment before you want them to, you need to consider the release dates. These dates determine when the assignment is visible to students.
Step 1: Choose who you want to set the dates for in the ‘Assign To’ field. Select ‘everyone’ initially to set the dates for the bulk of the class.
Step 2: Set the applicable Due Date & Time. This is when the ‘assessment’ will end. Any assignments submitted after this date/time will be flagged as ‘late’.
Step 3: Set the ‘Available From’ Date & Time. This is when the portal will open/the assessment will start.
Step 4: Set the ‘Until‘ date & time. This is when the portal will close. No assignments will be able to be submitted to the portal after this date/time.
Step 5: Click the +Add button (at the bottom) to assign and set different dates for specific students.

 By following the guidance below you will minimise the risk of any problems with student submissions or with students seeing the assessment before you had intended. Watch the instructional video below or refer to the step-by-step guidance further below.
VIDEO
 Link to video guidance for step by step instruction on how to Securely uploading and linking your assessment file
INSTRUCTIONAL TEXT
Upload and Link Assessment files
In order to ensure that the students only see the file/document at the commencement of the assessment and not beforehand follow the steps below:
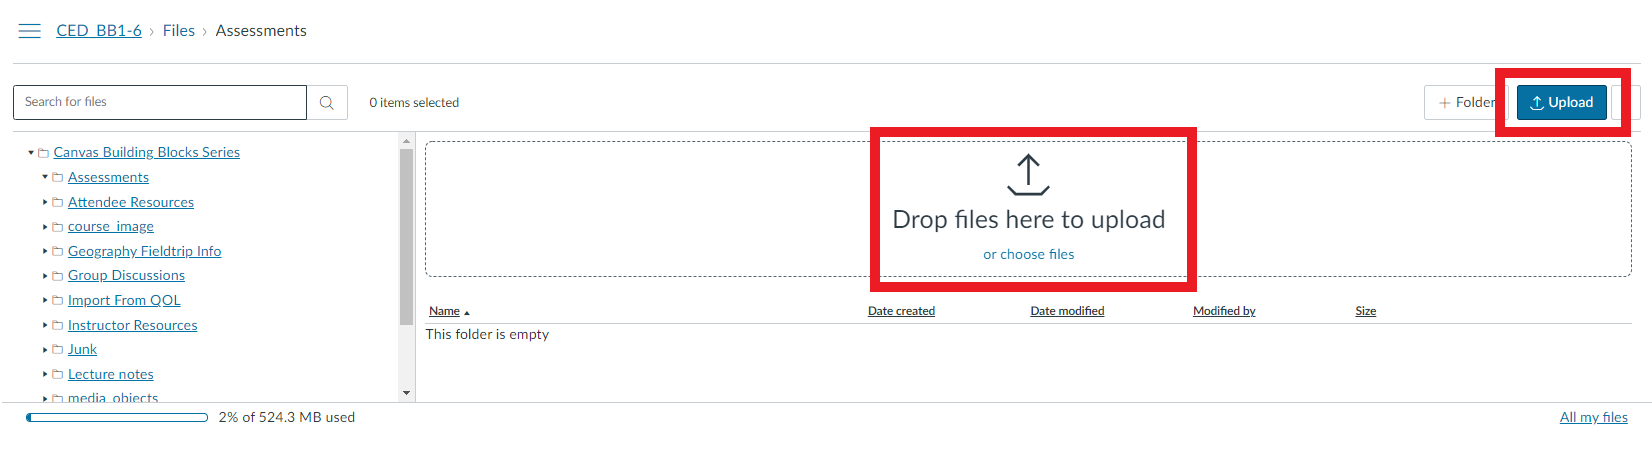
Step 1: Select ‘Files’ and create a separate folder for your assessment if required (see image below).
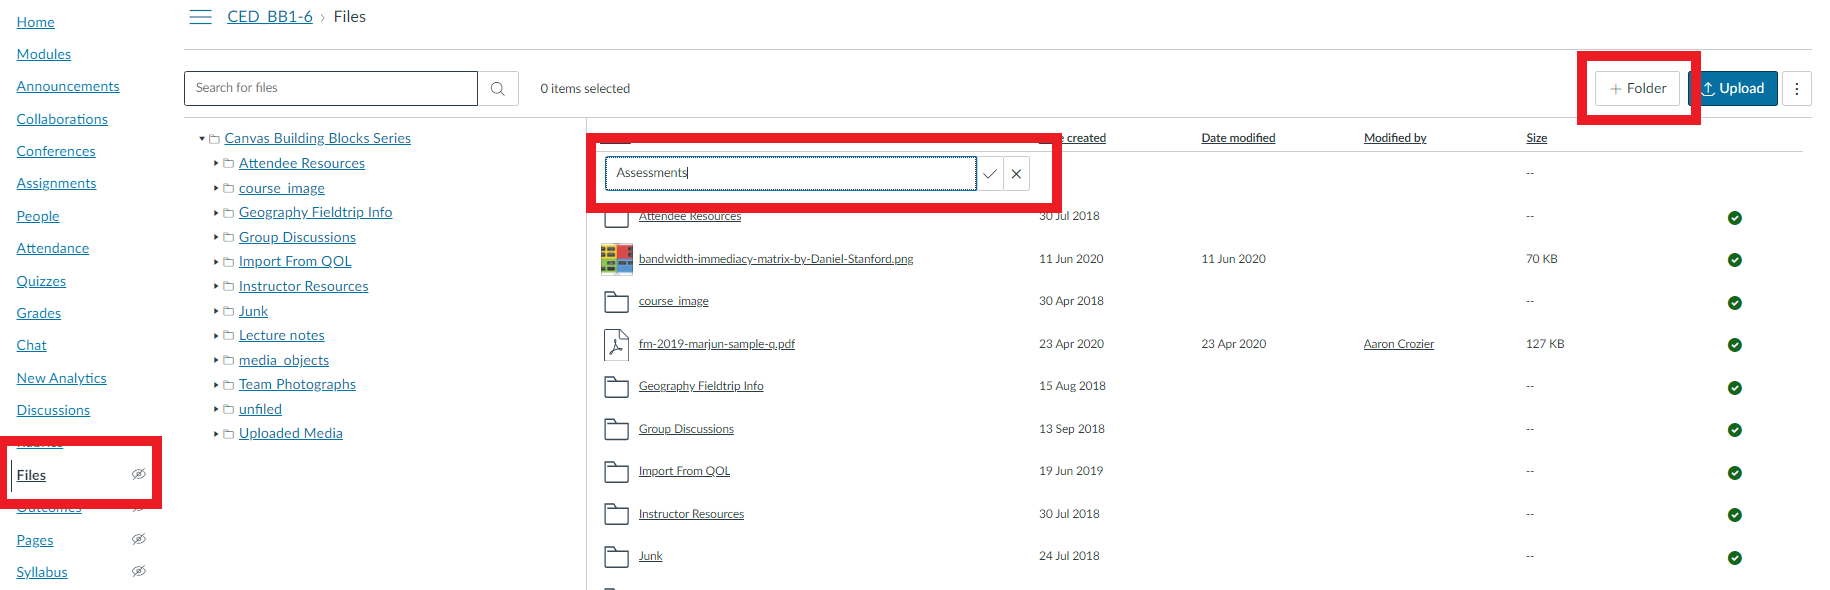
Step 2: Go into the new folder then choose ‘Upload’ or drag and drop your assessment document to upload (see image below).
Step 3: By default your file will be published and therefore viewable by students so once uploaded click on the green tick and choose the ‘Schedule student availability’ option to release the file at the time of your assessment .
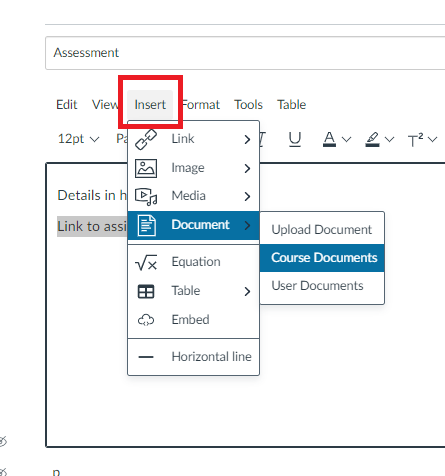
Step 4: Go to the assignment you have created and create a link to the file for students to download on the day of the assessment. To do this write some text you want to be the clickable link and highlight it. Select ‘Insert’ from the menu above, then ‘Document’ and ‘Course Document’. You will then be able to select the file from the pop-up menu and this will create the link (see image below).
Canvas makes it easy to mark the student’s work online. By following the guidance below you can easily view, grade and give feedback all within the Canvas ‘Speedgrader’ tool. Watch the instructional video below or refer to the step-by-step guidance further below.
VIDEO
Link to video guidance for step by step instruction on how to Grading Submissions & Feedback
INSTRUCTIONAL TEXT
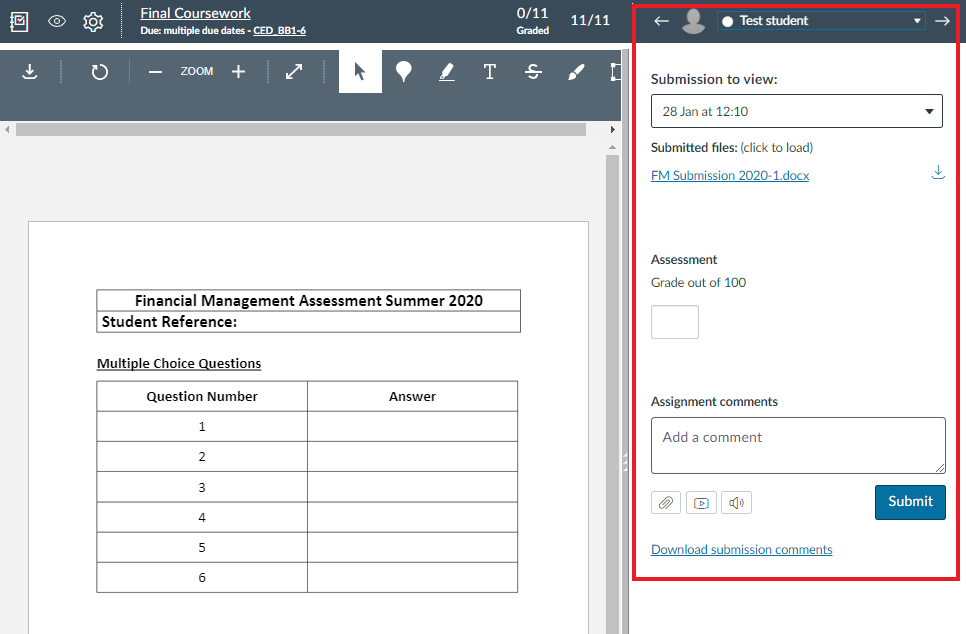
Mark the Submissions in Canvas Speedgrader
The easiest way to grade submissions is to utilise Canvas Speedgrader. This will enable you to mark the submissions online without the need to download and manage the submissions.
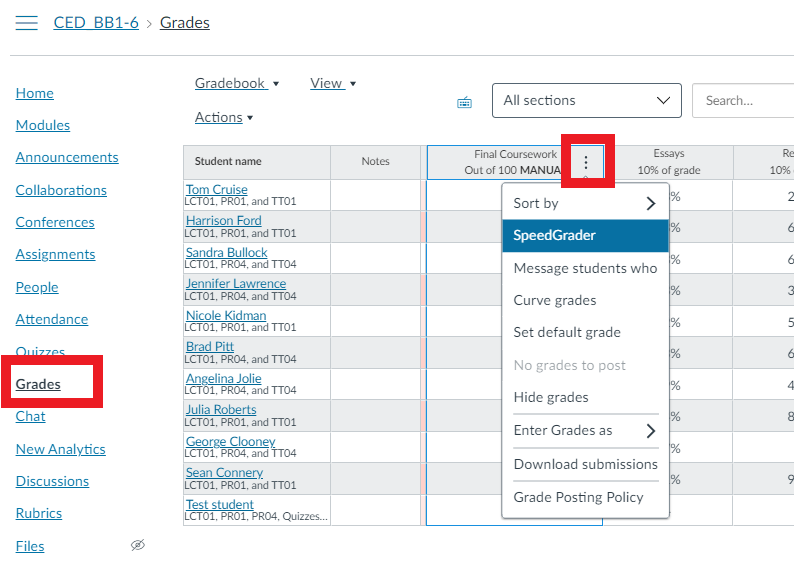
Step 1: In your Canvas course, select ‘Grades.’ Click on the ellipsis at the top of the relevant assignment column and select ‘Speedgrader’ (see image below).
Step 2: In Speedgrader use the annotation tools (at the top of the screen) to mark the submission with specific ‘inline comments’ on the face of the student submission (see image below).
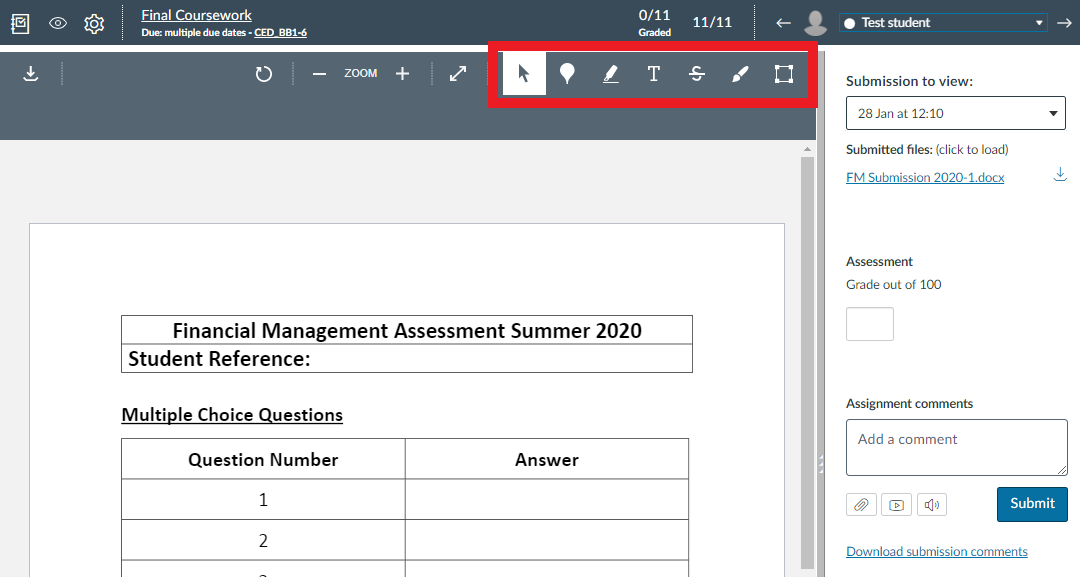
Step 3: On the right of the screen give the submission a ‘grade out of 100’, view and use a rubric if applicable and give the submission some general comments/feedback (don’t forget to click ‘submit’.)
Step 4: Once the submission is marked/feedback given, use the arrows (at the top right hand side of the page) to move onto the next student submission.
Release Grades/Feedback in Gradebook
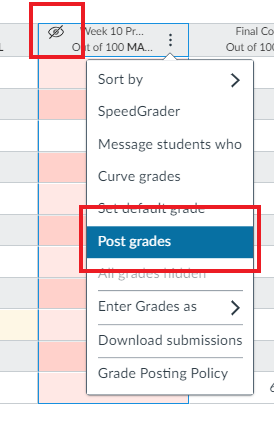
As we have set the grade posting policy to manual, we will have to post the grades when we want to release them. To do this follow the steps below.
Step 1: Select ‘Grades’ and then the column of the assignment you want to release. Click the ellipsis button and select ‘Post Grades‘. The ‘eye icon’ (signifying no visibility) on the assignment column will disappear once you ‘post grades’ to signify that the grades and feedback have been released and are now ‘visible’ to students. (see image below)
![]() When setting up your Assignments, please refer to the Canvas Assignment Checklist to ensure your setup is correct.
When setting up your Assignments, please refer to the Canvas Assignment Checklist to ensure your setup is correct.