
 Reset your Module Development Area:
Live Academic Modules are now available in Canvas.
Use Module Development Areas (MDAs) as a safe place to prepare content and activities as this is a space which is not visible to students. Watch the video below to understand why you would reset your MDA for the purpose of module development. [3:02min]
For Live Academic Modules that are new (i.e. that did not exist last year) staff can request a Module Development Area (MDA) to help with module content preparation. To do so, please submit a support ticket through the Help button in Canvas. These new MDAs will be empty, therefore when following the normal course setup process, staff can skip the step to ‘Reset your MDA’ of any existing content.
 Link to video guidance for step by step instructions on how to reset your Module Development Area
Copy Content from last year’s Academic Module into your MDA:
The next step is to import the content from last year’s academic module into your blank MDA to create a starting point for the development of next year’s academic module, ahead of the new semester. This short video will show you how to do it. [3:42 min]
Link to video guidance for step by step instructions on how to Import last year’s content to Development Area
Import New QUB Templates
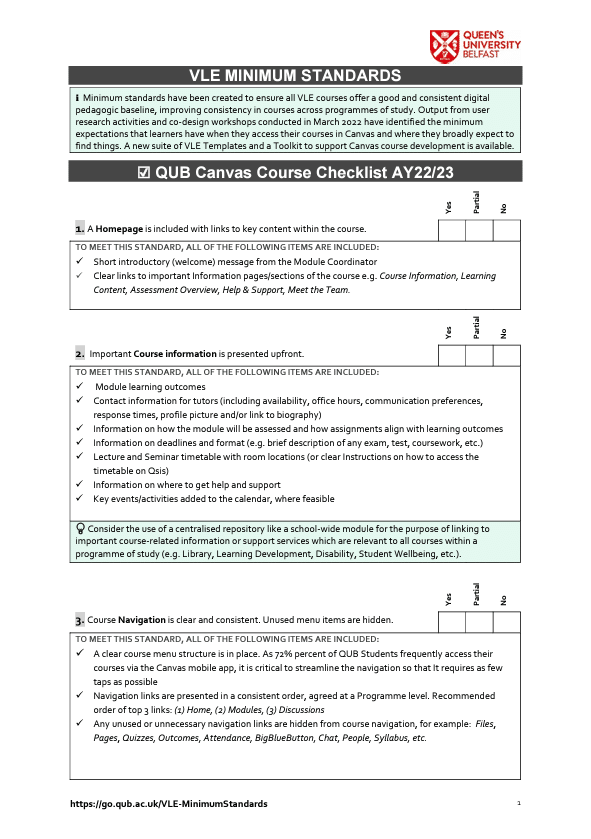
A suite of Canvas VLE Templates has been created for use in Canvas courses. The aim of the templates is to support the application of the new VLE Minimum Standards for QUB Canvas courses.
Review the QUB Template(s) and decide if you would like to import any of them into your MDA to fast track your course development. Templates available for import include the Homepage, the Course Overview module, the Week 1 example module and the full course template. The links below provide more information with step by step instructions on how to do this.
 Link to step by step instructions on how to use the Canvas VLE Templates Link to video guidance for step by step instructions on how to Import Template Pages
Create/Update Your Homepage:
Ensure that your course has a Homepage (Minimum Standard #1) to greet students each time they access your course. Keep it simple; all you need is a short welcome message. Follow the steps in this short video to see how to quickly and easily create a new Homepage or update an existing one [2:51 min]
Link to video guidance for step by step instructions on how to Create/Update Your Homepage
Create a Learner Journey:
Minimum Standards #2, #3, #4 and #5 are all centred around the learner journey. Build a framework for your course content so students can easily navigate through the learning materials in a meaningful way (e.g. weeks, units, themes or topics). This video will show you how organise your canvas course using the ‘Canvas Modules’ feature. [6:38 min]
Link to video guidance for step by step instructions on how to Create a Learner Journey
Guide Learning with Requirements and Prerequisites:
Decide how you want to release content and activities to guide learners through your course material. To understand how the Requirements and Prerequisites features can be used (independently) to help guide learning, watch the following video. [8:28 min]
Link to video guidance for step by step instructions on how to Guide Learning with Requirements and Prerequisites
Learner Analytics:
Course statistics give you a glimpse into which Assignments, Discussions, and Quizzes are engaging students and what might be improved in the future. It will also help you to detect which students are not participating to the fullest or have started to fall behind the rest of the class. Please review the Learner Analytics guidance contained in the Connected Learning at Queen’s Course.
Copyright:
If you need help with understanding the various complexities related to what content you can use, share, modify in an educational context, particularly for online teaching, please review the Copyright guidance contained in the Connected Learning at Queen’s Course.
Copyright, Creative Commons & OER
Accessibility:
Minimum Standard #7 contains important elements to consider in relation to the accessibility of your course. To understand why accessibility is so important and to become more knowledgeable about its positive impact on inclusion and the learner experience, see the link to the Accessibility Toolkit which is a self-paced course where you can work independently through the content, at a time that suits you. In the course, you will find numerous resources to inform and build awareness around accessibility for all staff who engage with students and develop content. You can view the short welcome video to the course below [2:42]
Link to The Accessibility Toolkit course
Link to the Accessibility Toolkit welcome video
Import Content and Review your Course:
Once you have developed your course content in the Module Development Area (MDA), you will need to import this content into the new Academic Module that has active student enrolments, ahead of the new semester.
An important step before you publish is to check your course against the Go Live Checklist. The Checklist outlines steps that are recommended in preparation for publishing your course before the start of each term.
Canvas can also check your course for broken links using the Canvas Link Checker. Any embedded resources must be checked manually. It is important to check that the links in your course are working as expected before you publish the course.
You can also adjust your Course Navigation menu so that students see only the links they need to (Minimum Standard #3). The video below shows you how to do this [1:58 min].
Link to video guidance for step by step instructions on how to Remove and Reorder Navigation Links
Publish your new Academic Module:
The final step is to make your Canvas course visible to students. Publish your new Academic Module so your students can access the content and activities. Remember there are 3 levels to publishing your content/course. This short video will show you how Import and Publish so that students can access your canvas course. [3:31 min]
Link to video guidance for step by step instructions on how to Publish your new Academic Module