

- Locate the Microcredentials Template in Canvas Commons (located in the Global Navigation menu on the left of the screen).
- Search for QUB Microcredentials Template
The following symbol indicates a Module on Canvas Commons:
- Once you have located the correct content in Canvas, select the Import/Download button on the right hand side.

- Select your course from the list or use the search bar to locate your course, and scroll down to select Import into course.

- If your DEVELOP space (Module Development Area) already contains course content, import individual canvas modules from Canvas Commons -this will prevent your existing course content being overwritten.
- Locate the Microcredentials Template in Canvas Commons (located in the Global Navigation menu on the left of the screen).
- Search for one of the following Microcredentials Template module names:
- QUB Microcredentials Template: Course Overview
- QUB Microcredentials Template: Module Example 1
- QUB Microcredentials Template: Module Example 2
- QUB Microcredentials Template: Additional Template Pages
The following symbol indicates a Module on Canvas Commons:
- Once you have located the correct content in Canvas, select the Import/Download button on the right hand side.
- Select your course from the list or use the search bar to locate your course, and scroll down to select Import into course.
- Repeats steps 3-5 for each individual module.
The following is a checklist of initial steps to complete when importing the Microcredentials Template from Canvas Commons. Completing these steps will ensure the template is ready to use and course content can then be added.
- Change the Course Banner image on the Homepage (see videos below).
- Change the Course Card image (see video below). You can access templates for banners and course cards in the Microcredential Template Design Assets folder.
- Update the Learning Content button on the Homepage (this applies to Option 2 only). Please note that the html code needs to be updated to maintain the formatting of the button - if you would like help with this, please contact elearning@qub.ac.uk
- The Homepage should be set as the ‘Front Page’ of your course. Select the 3 dots on the top right-hand corner of the screen and set ‘Use as Front page’ (see video below). This will already be set if you have imported the template as a full course as per Option 1.
- If required, change the Course Navigation Menu - go to Settings > Navigation, and re-order as required (see video below).
- Once you have imported the template and completed the steps above, click Edit in the top right corner of any page to begin editing and adding content.
- Explore the guidance in Using the Template Pages below for more information on the template content and how to start adding your course content.
The following videos provide demonstrations of some of the steps above. Click on the Playlist Icon ![]() to view or minimise the playlist menu.
to view or minimise the playlist menu.
Sections in Canvas are administrative sub-groups that indicate how students are enrolled on a course. It allows module convenors to identify different groups of students (for example, tutorial groups) and use this information to communicate with different cohorts, set differentiated due dates for assignments, and more.
In the case of combined modules, for example, Sections indicate if a student is enrolled in the module during the autumn or spring semester. Students taking the course as a Microcredential will be indicated by the Section code MC01.
Sections can be found by clicking People in the course navigation menu, which will display a table containing the names students and staff registered on your course, their Section(s), and their role (Student, Teacher etc.).
See below for more examples of how Sections can be utilised to communicate with students and organise your course.
Announcements are a useful way of sharing important information with students taking your course.
You can send an Announcement to all students, or to different cohorts (Sections) of students, including students taking your course as a Microcredential.
- Select Announcements in the Course Navigation Menu.
- Click Add Announcement.
- Add your title, content, and any attachments or additional settings as required.
- In the Post to option, you can choose to post your announcements to All Sections (all students enrolled to your course), or a specific Section (for example MC01 for students taking your course as a Microcredential).
Depending the nature of your course, you may wish to make some content available to different cohorts of students. This can be done by assigning access to different modules or pages.
Assign access to a Page:
- Click Edit on the relevant Page.
- Under Assign Access, select Everyone or select a specific Section from the drop-down menu.
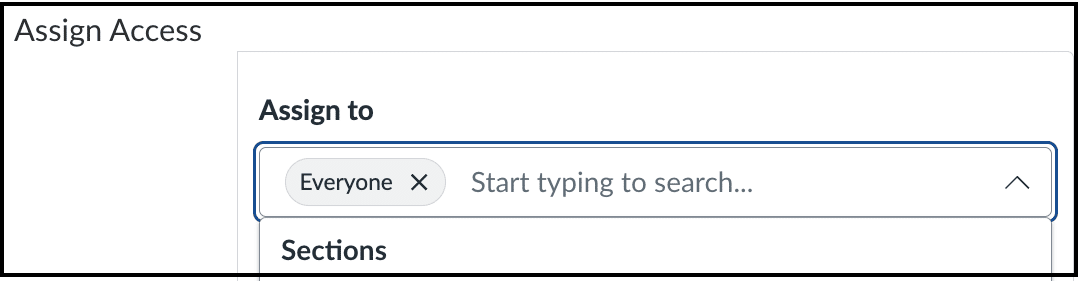
- You can also set start and end dates and times to control when the content becomes available and when access closes.
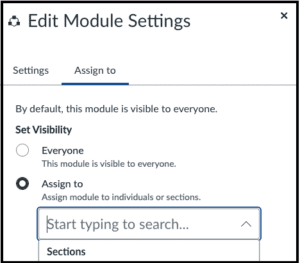
Assign access to a Module:
- Select Modules in the Course Navigation Menu.
- Find the relevant module - click the ellipsis menu and select Assign to...
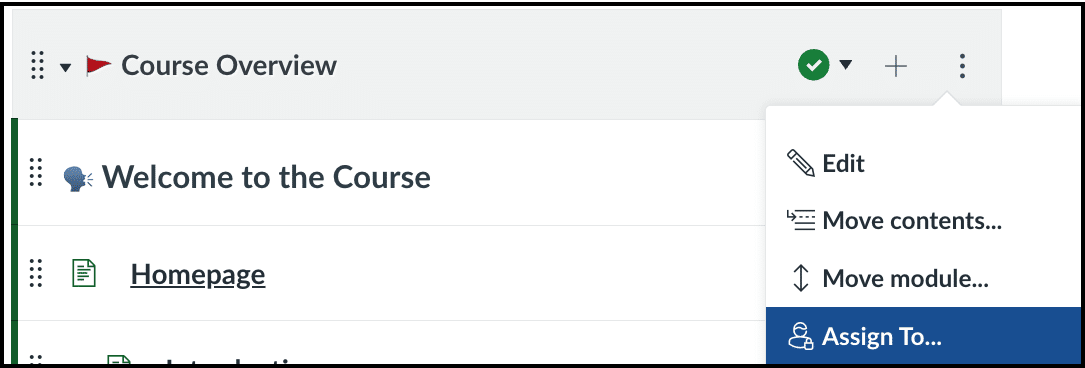
- Set Visibility of the module of Everyone, or select Assign to for specific Section from the drop-down menu.
Depending the nature of your course, you may wish to assign different assignments and quizzes to different cohorts of students, or to set differentiated due dates. This can be done via the Assign access option when setting up assignments or quizzes.
Assign Access in Assignments and Quizzes:
- Click Edit in the relevant Assignment or Quiz.
- Under Assign Access, you can assign the assignment or quiz to Everyone (all students enrolled in your course), or to a specific Section via the drop-down menu.
- Set additional settings such as due date and time, available from (date and time), and available until (date and time). You can set differentiated due dates for the same assignment or quiz by clicking the + Assign to button.

For more detailed information on setting up assignments and quizzes, explore the Canvas Training video catalogue:
You may wish to set up your Canvas course so that you can track how much of the course each student has completed. This can be achieved by adding Requirements to each Canvas module. Requirements allow you to specify actions that students must complete, such as viewing a page, marking a page as done, or completing another activity. If necessary, learning content can be locked until certain actions are completed. Once requirements are set, you will be able to track students’ progress through the course via the View Progress button (see below).
Setting Requirements
- Go to the Modules section of course. Select a module, click the ellipsis on the right hand side, and click Edit.
- Click the + Requirement button. (Prerequisites can also be set if required).
- You can decide if the student has to Complete all of the requirements you set, or to Complete one. You can also decide whether or not the Students must move through requirements in sequential order.
- One requirement can be set for each content item within your module. Select the Page, Quiz, Discussion or Assignment from the first drop-down menu. Then select the requirement from the second drop-down menu.
- Different options will be available, depending on the learning content you select. For example, the options for Page are: 'View this item', 'Mark as done', or 'Contribute to the page', and the options for Quiz are: 'View the item', 'Submit the assignment', or 'Score at least...'
- Click the + Requirement button again to set additional requirements. Click Save when you are done.
Viewing Student Progress
Once requirements are set up, you can view the progress of students by clicking the View Progress button at the top of the Modules page. A list of students will appear on the right hand side - select the student you wish to view.
For additional insight into how students are interacting with your Canvas course, you can access Course Analytics. This provides data on page views, participation, assignment submissions, and other metrics that may help you assess student engagement and identify where additional support may be needed.
While Course Analytics can offer useful insights, it may not provide the full context, so it is important to consider other factors and gather additional information to develop a more complete understanding of students’ participation in your course.
Watch the following video for an overview of the data available in Course Analytics.
Click on the Playlist Icon ![]() to view or minimise the playlist menu.
to view or minimise the playlist menu.