
Continuous Assessment and Coursework
Appropriate use of Assignments
⏺️ Please note that the assignment guidance outlined in this guide will support you in setting up and administering Canvas Assignments for the purpose of continuous assessment / coursework. It has been designed to help you quickly and easily consider how best to use assignments in Canvas in order to avoid any potential pitfalls.
◼️ Anonymous Grading: The QUB Handbook of Assessment Guidance and Support requires Anonymous Marking for assessment, where possible. The way in which Canvas applies fully anonymous grading means that schools may have difficulty when it comes to identifying students with exceptional circumstances or late submissions. This is an issue common across all UK Universities who are currently using anonymous marking functionality in Canvas. Link to information on key considerations when using Anonymous grading in Canvas.
◼️ Use of Turnitin – In situations where you need to use Turnitin, including for the purpose of dissertations, please ensure you follow the correct set up guidance to minimise any potential issues, noting in particular guidance around the 3 options available for generation of similarity reports for student submission. Online Training is available and advisable for staff using Turnitin. You can search the Training Events Calendar for availability. Please also refer to the latest guidance in the following: 🔗 Turnitin within Canvas: Staff Guide
Important steps to prepare, setup and grade Assignments
🔴 There are a few steps that you should undertake prior to creating your assignment(s) in Canvas to ensure the process is a seamless as possible and that you create them in a way that impacts least on any students currently enrolled in the course. To get started, watch the instructional video below or refer to the step-by-step guidance further below.
VIDEO
▶️ Link to video guidance for step by step instruction on how to Prepare to create your Assignment
INSTRUCTIONAL TEXT
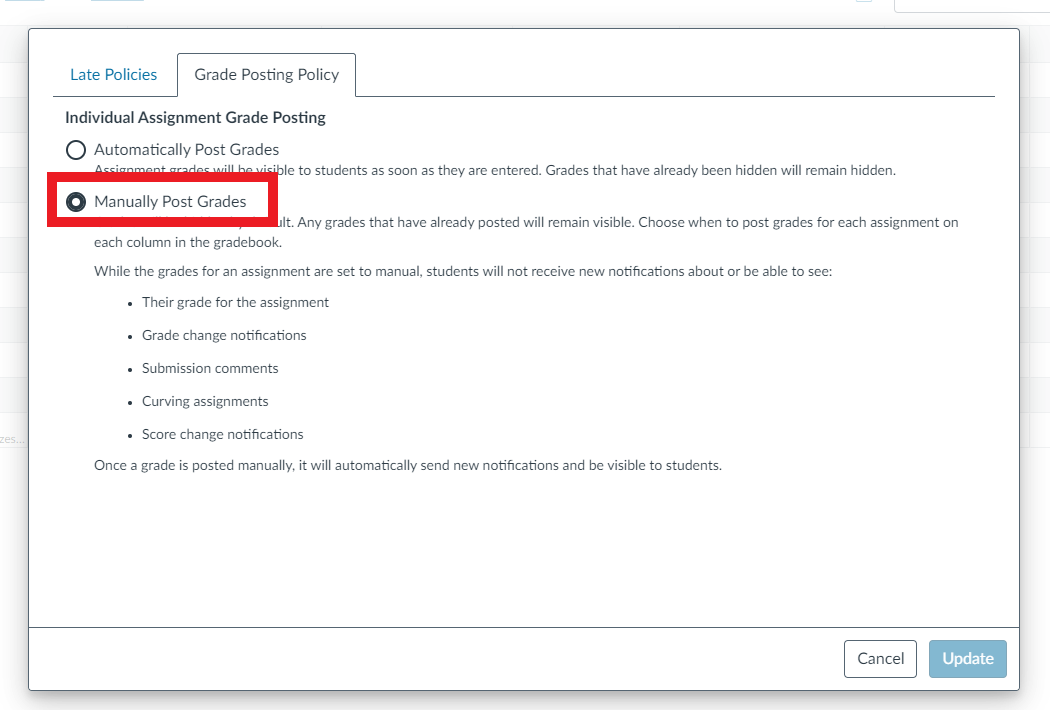
◼️ Ensure that the Grade Posting Policy is set to ‘Manual’
The Grade Posting Policy is set to ‘Automatic’ by default. If this is not changed to ‘Manual’ then any grades that are input into Canvas will be released to students immediately. The steps to do this are as follows:
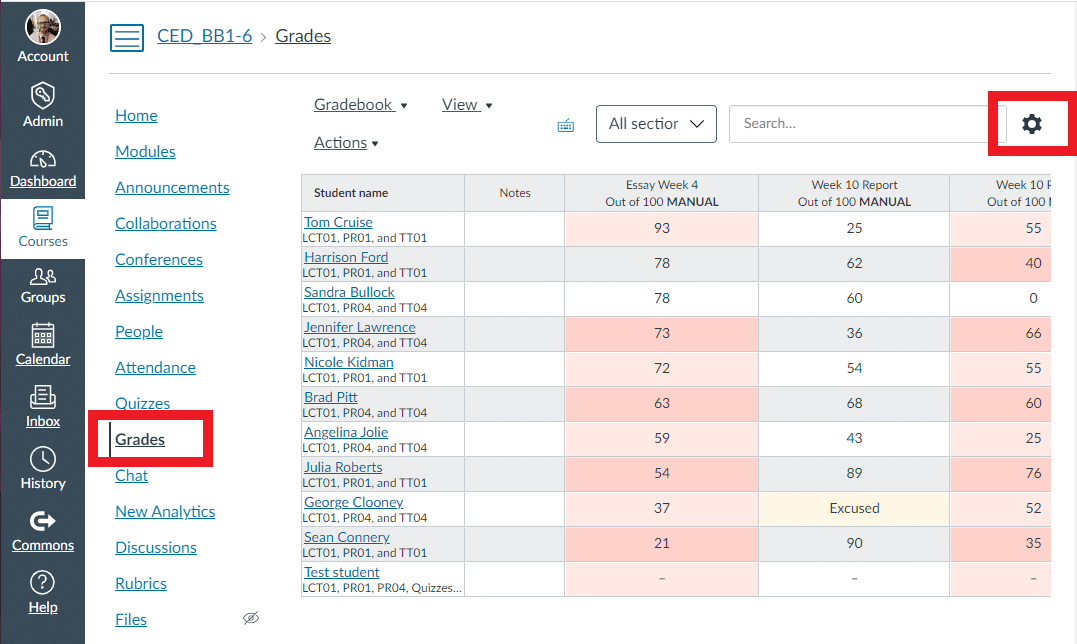
- Step 1: Go to ‘Grades’ within the course you are working on.
- Step 2: Click on the ‘Settings Cog’ on the top right of your screen (see image below).
- Step 3: Click the ‘Grade Posting Policy’ tab and ensure the radio button is set to ‘Manually Post Grades.’ (see image below).
◼️ Hide Running Grade Totals
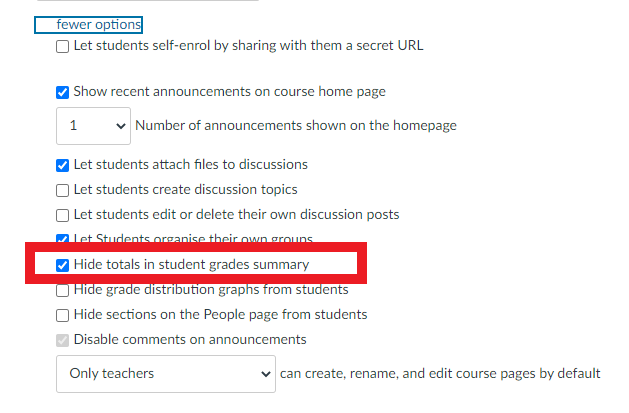
Canvas automatically provides the student with a running total based on assessment taken to date. To avoid potential confusion and anxiety we advise hiding this total. The steps to do this are as follows:
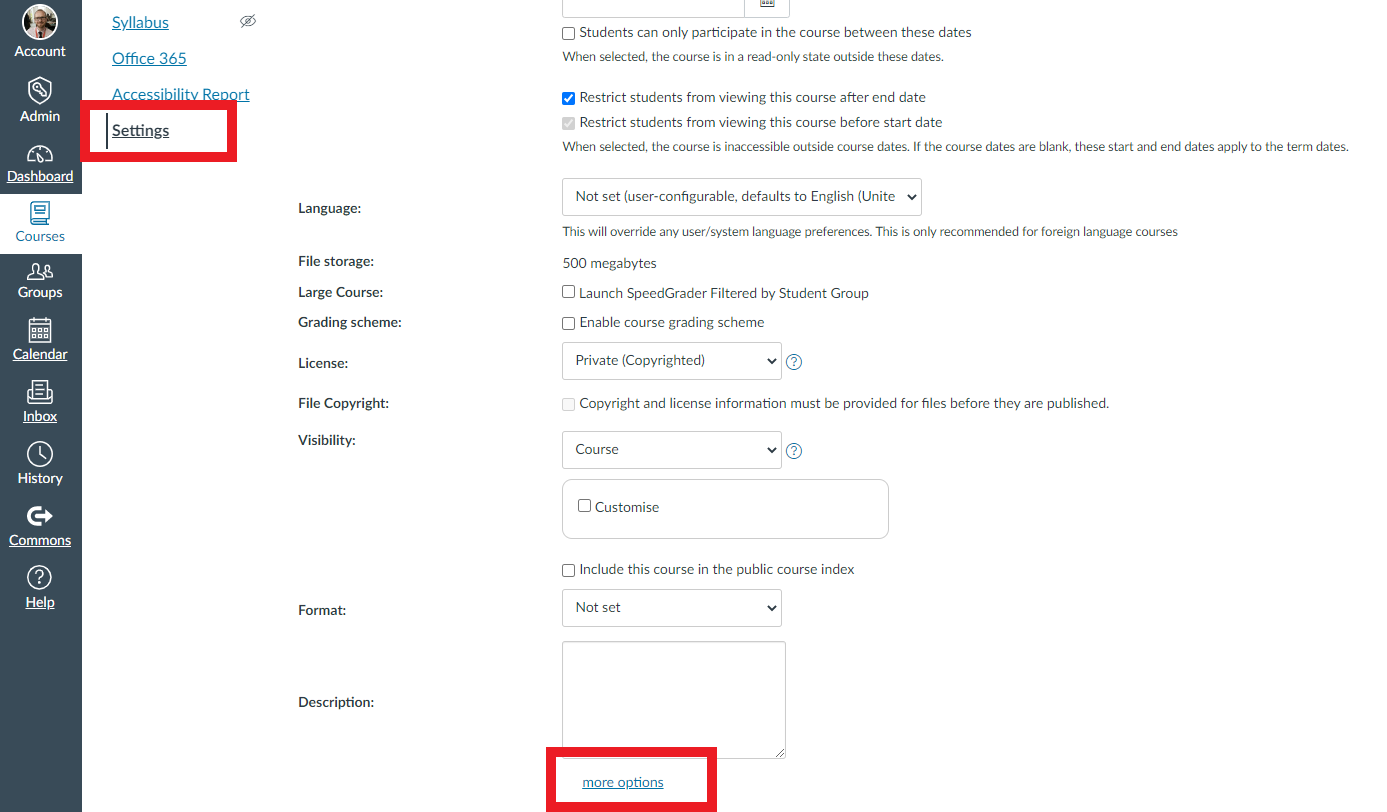
- Step 1: Go to ‘Settings’ in the menu on the left of the course you are working on.
- Step 2: Click the ‘Course Details’ tab and scroll to the bottom of the page to select ‘More Options’ (see image below).
- Step 3: Tick the checkbox ‘Hide Totals in Student Grades Summary’ then ‘Update Course Details.’ (see image below).
◼️ Create an Assignment Group for Each Assignment
In order to weight your assignments as required, you will need to create an ‘Assignment Group’ for each one. You will then be able to weight the groups using the ‘Assignment Groups Weight’ function. The steps to do this are as follows:
- Step 1: Go to ‘Assignments’ in the menu on the left of the course you are working on.
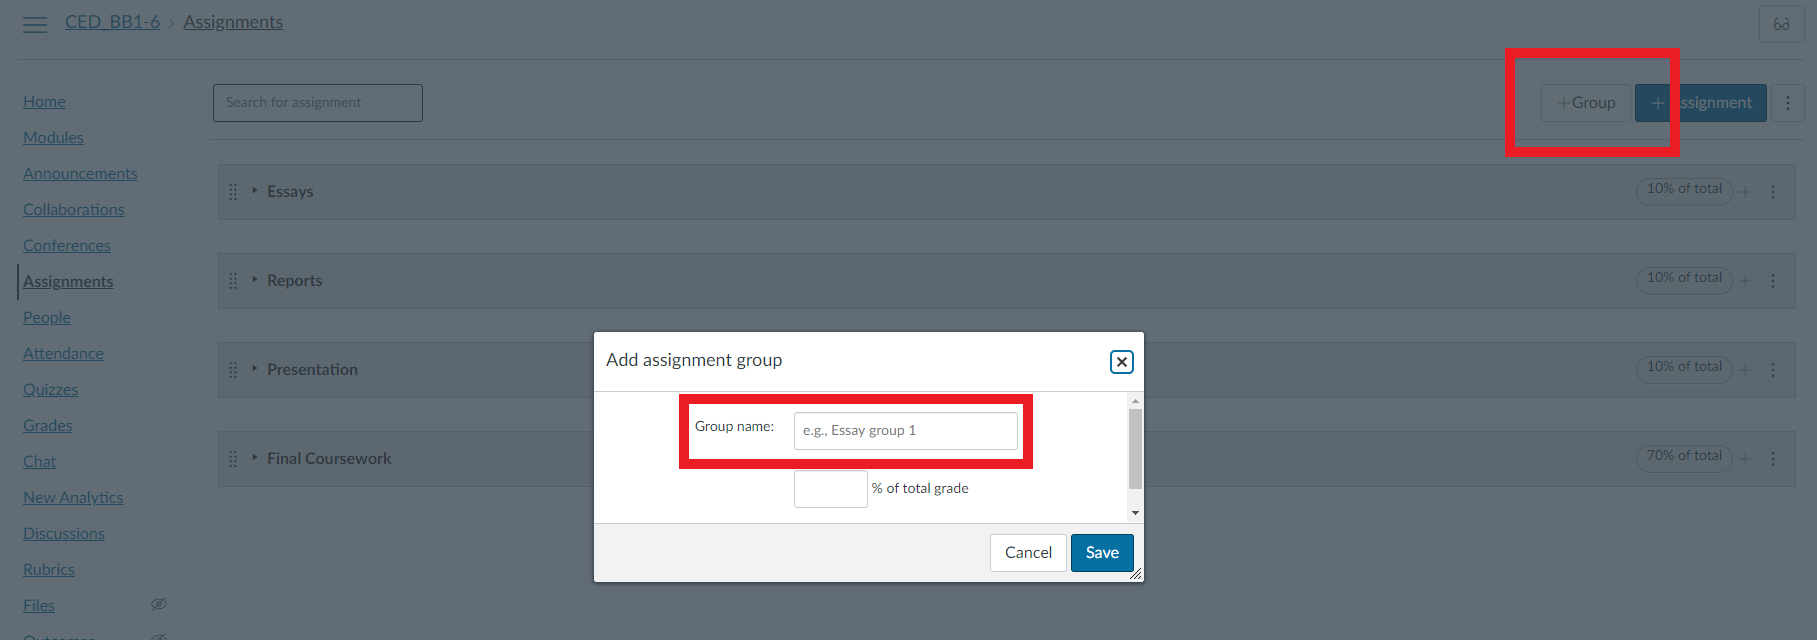
- Step 2: In the top right of the screen select the ‘+Group’ button and give your assignment group a name in the pop-up (see image below).
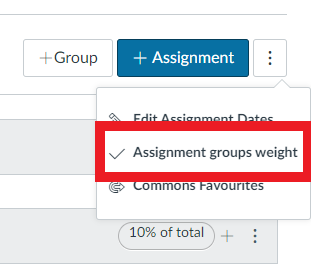
- Step 3: Once you have created an assignment group for each assignment click on the ellipsis beside ‘+Assignment’ and select ‘Assignment Groups Weight’ (see image below).
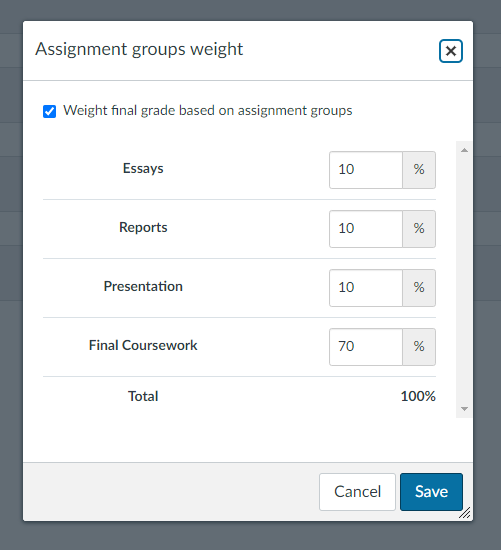
- Step 4: Click in the box to ‘Weight final grade based on assignment groups’ and input the weighting for each assignment before saving (see image below).
🔴 By following the guidance below you will minimise the risk of any problems with student submissions or with students seeing the assignment before you had intended.
Watch the instructional video below or refer to the step-by-step guidance further below.
VIDEO
▶️ Link to video guidance for step by step instruction on how to Set up and Administration of Assignments
INSTRUCTIONAL TEXT
◼️Make the instructions clear and unambiguous
You should give instructions in a way that leaves no room for ambiguity and makes it clear exactly what students need to do.
- Step 1: In your Canvas course, click on ‘Assignments.’ and then ‘+Assignment’ to start setting up your assignment.
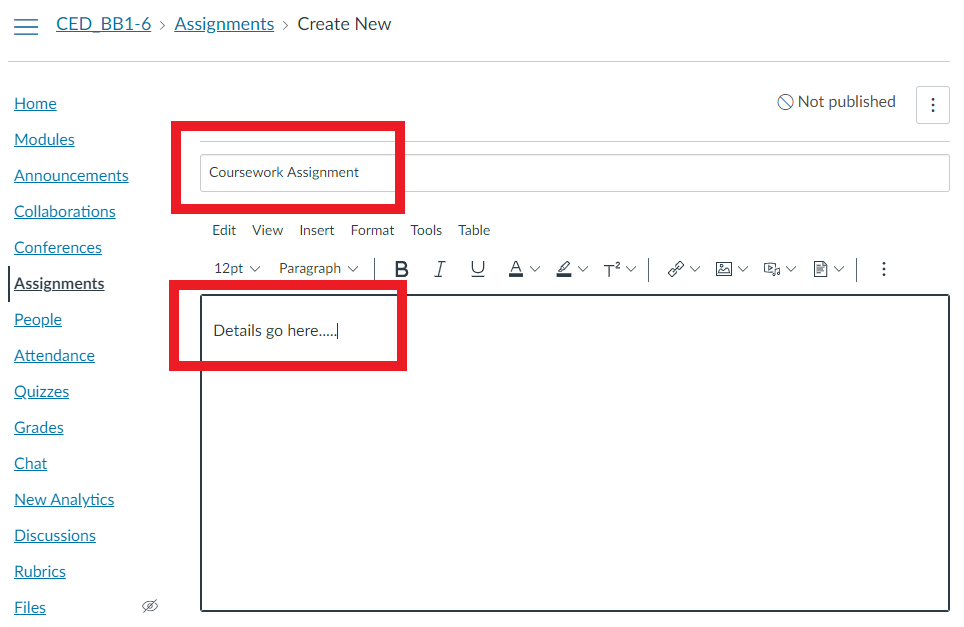
- Step 2: Give your assignment a title and enter all the ‘instructions to students’ into the into the box (see image below).
◼️Follow the detailed set-up outlined in the assignment checklist
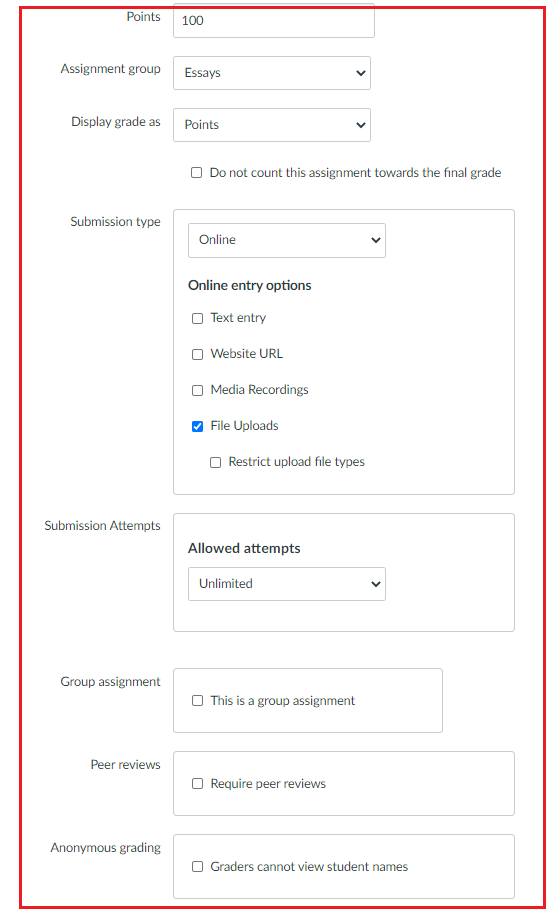
The checklist outlines the key settings that need to be considered when creating your assignment to ensure that there are no problems and that students will be able to submit without difficulty. Some of the main ones are outlined below:
✅Points: Set to 100
✅Assignment Group: Place your ‘Assignment’ into the new ‘Assignment Group’ you created earlier.
✅Display Grade As: Set to ‘points.’
✅ Submission Type: Set to ‘online and ‘file upload.’ (Note: Turnitin assignments are NOT recommended, but if you are choosing to set up a Turnitin assignment select the ‘External tool’ option and refer to the additional guidance on this topic.)
✅ Group Assignments & Peer Reviews: Only tick these options if this applies to your assignment.
✅ Anonymous Grading: The QUB Handbook of Assessment Guidance and Support requires Anonymous Marking for assessment, where possible. The way in which Canvas applies fully anonymous grading means that schools may have difficulty when it comes to identifying students with exceptional circumstances or late submissions. This is an issue common across all UK Universities who are currently using anonymous marking functionality in Canvas. For considerations when using Anonymous grading in Canvas, please see further information here.
✅ Anonymous Instructor Annotations: Only tick this option if this applies to your assignment.
⬛ Check the ‘available from’ and the ‘available to’ dates/times are set before publishing
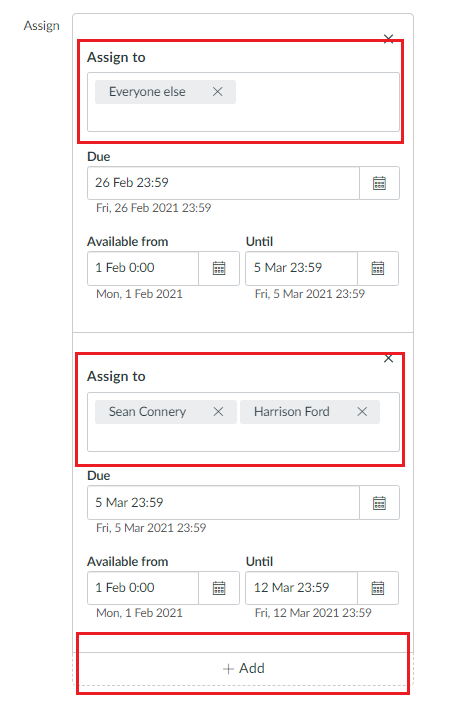
To ensure that students do not see the assignment before you want them to you need to consider the release dates. These dates determine when the assignment is visible to students.
- Step 1: Choose who you want to set the dates for in the ‘Assign To’ field. Select ‘everyone’ initially to set the dates for the bulk of the class.
- Step 2: Set the applicable Due Date & Time. This is when the ‘assessment’ will end. Any assignments submitted after this date/time will be flagged as ‘late’.
- Step 3: Set the 'Available From' Date & Time. This is when the portal will open/the assessment will start.
- Step 4: Set the ‘Until‘ date & time. This is when the portal will close. No assignments will be able to be submitted to the portal after this date/time.
- Step 5: Click the +Add button (at the bottom) to assign and set different dates for specific students. (Differentiated due dates functionality is only available on Canvas assignments, Turnitin does NOT support differentiated due dates.)
🔴 Canvas makes it easy to mark the student's work online. By following the guidance below you can easily view, grade and give feedback all within the Canvas 'Speedgrader' tool.
Watch the instructional video below or refer to the step-by-step guidance further below.
VIDEO
▶️ Link to video guidance for step by step instruction on how to Grading Submissions & Feedback
INSTRUCTIONAL TEXT
◼️ Mark the Submissions in Canvas Speedgrader
The easiest way to grade submissions is to utilise Canvas Speedgrader. This will enable you to mark the submissions online without the need to download and manage the submissions.
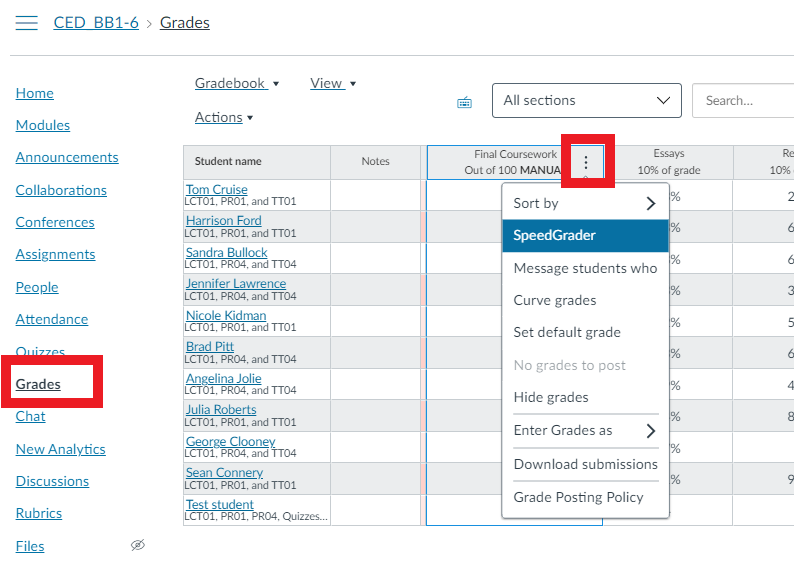
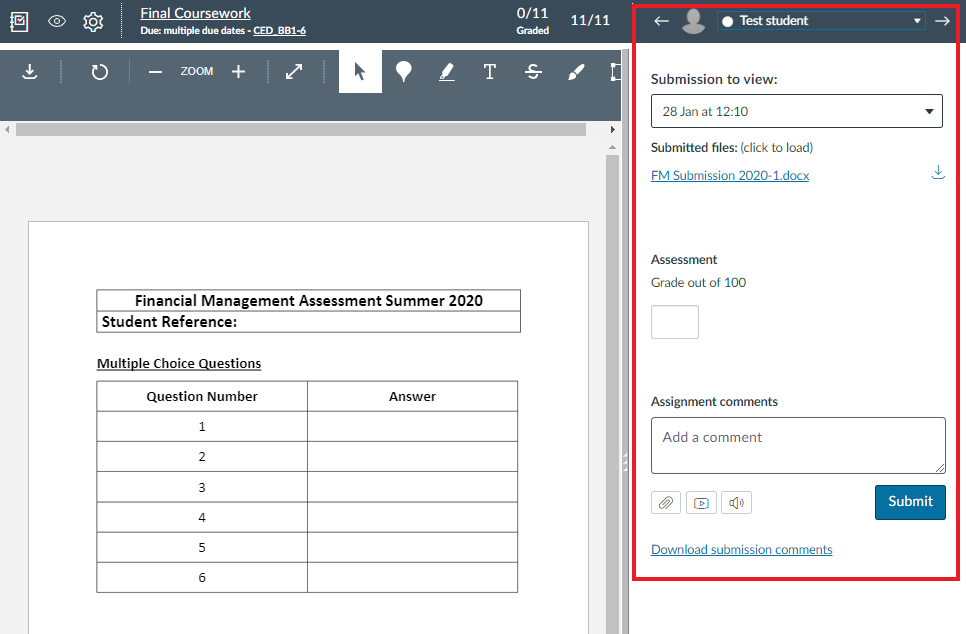
- Step 1: In your Canvas course, select ‘Grades.’ Click on the ellipsis at the top of the relevant assignment column and select ‘Speedgrader’ (see image below).
- Step 2: In Speedgrader use the annotation tools (at the top of the screen) to mark the submission with specific ‘inline comments’ on the face of the student submission (see image below).
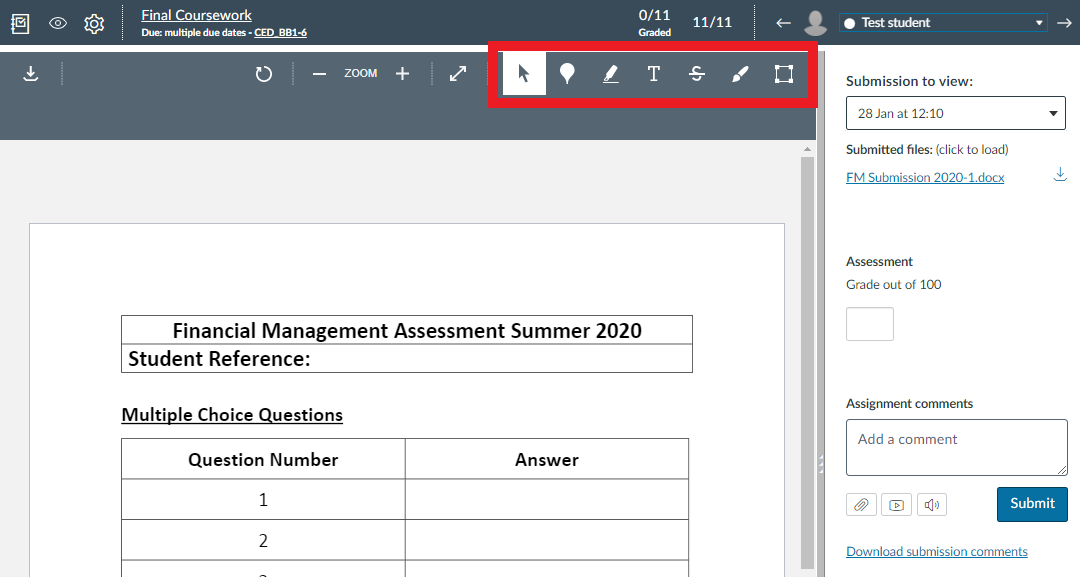
- Step 3: On the right of the screen give the submission a ‘grade out of 100’, view and use a rubric if applicable and give the submission some general comments/feedback (don’t forget to click ‘submit.’)
- Step 4: Once the submission is marked/feedback given, use the arrows (at the top right hand side of the page) to move onto the next student submission.
◼️Release Grades/Feedback in Gradebook
As we have set the grade posting policy to manual, we will have to post the grades when we want to release them. To do this follow the steps below.
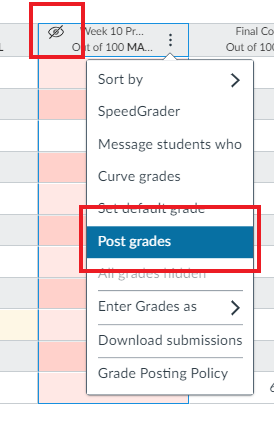
- Step 1: Select ‘Grades’ and then the column of the assignment you want to release. Click the ellipsis button and select ‘Post Grades‘. The ‘eye icon’ (signifying no visibility) on the assignment column will disappear once you ‘post grades’ to signify that the grades and feedback have been released and are now ‘visible’ to students. (see image below)
⏺️ When setting up your Assignments, please refer to the Canvas Assignment Checklist to ensure your setup is correct.
Appropriate use of Quizzes
If you are intending to use Canvas Quizzes during Semester 2 to support continuous assessment, there are some important considerations that you should take into account. Good assessment design is imperative in addition to the use of question banks and question groups in Canvas to reduce the potential for concerns that may impact on the assessment process. If you do have a valid requirement to use Canvas Quizzes for continuous assessment / coursework which have been scheduled outside of the formal examination period in May 2025, please ensure you follow the guidance outlined below to avoid any potential pitfalls.
❕Please note the following key advice (specific to use of Quizzes for continuous assessment / coursework):
◼️Considered use of Quizzes – In this current situation, schools are advised NOT to use Canvas Quizzes in any situation that relies on students having bandwidth and equipment to submit in a short time-frame, which really puts concentrated pressure on the system.
◼️Anonymous Grading: The process of anonymous grading in Canvas raises potential issues such as; problems in the identification of students with exceptional circumstances, late submissions and feedback to all students. This may impact on the student experience and schools are advised to be aware of this.
Important steps to create question banks, groups and question types in Quizzes
🔴The main considerations around the use of Canvas Quizzes fall under three key areas:
◼️Appropriate Environment and Equipment
Will the students have the technical equipment and physical location available at the time of the quiz to complete it. The use of a time-bound objective test type quiz relies on students having access to Canvas at the time of the quiz in an appropriate location with appropriate technology and appropriate connectivity. Please consider whether all students are likely to have all 3 of these when considering the use of Canvas Quizzes.
Alternative: Use Canvas Assignments to enable students to submit the answers to the same questions you intended to use in your Canvas Quiz to mitigate the risks outlined above.
◼️Assessment Design
Is the use of objective test questions such as MCQs appropriate to the learning outcomes of your course? If the learning outcomes of your course are focused on understanding, comprehension and application then it is difficult to test these using short form objective test questions. These types of questions will usually test knowledge and recall rather than understanding and application. If a student can conduct an internet search and easily find the answer to the question you are asking, for example; What is the capital of Mongolia?, then that question is likely to be knowledge based. If however the question was based on a scenario written by you, for example; Based on the scenario above which of the following ethical principles is under threat?, then this answer could not be easily ‘Googled’ and tests the application of knowledge. In higher education we are generally expecting understanding and critical thinking to be demonstrated so it is important to consider whether the questions in a quiz are appropriate for summative assessment.
Alternative: Use of Canvas Assignments to have students submit a longer, more considered piece of work that is related to the understanding of the content and authentic to their experience on the course.
◼️Quiz Integrity
Can the integrity of the Quiz be guaranteed? Related to point 1 above the students will easily be able to search out the answers online in the current situation if the questions in your quiz are ‘knowledge based’. In addition to this, there is the risk that students may collude to answer questions collectively. You can overcome the first of these issues by good assessment design as described above, but please consider the potential impact of the second of these when designing your quiz and consider the use of Question Banks and Question Groups in Canvas to reduce the potential for such concerns to impact your assessment if you feel a quiz is still appropriate.
Alternative: Careful construction of appropriate questions and use of Question Banks and Question groups.
🔴Watch the following instructional video which outlines how to create and use a question bank or refer to the guidance further below.
Video
▶️Link to video guidance for step by step instruction on how to Create a Question Bank
Instructional Text
◼️Create a Question Bank
It is good practice to set up question banks first BEFORE creating the quiz. This is where all your questions are stored. This is a lengthier process than manually adding questions individually to a quiz, but the benefits are that your questions can be re-used multiple times for future use.
🔗How do I create a question bank in a Canvas course?
NOTE: The linked guidance above points out the difference between Canvas Quiz engines (Classic Quizzes) and (New Quizzes), but please ignore this as we have Classic Quizzes only in QUB.
🔴Watch the following instructional video to learn how to create a question group linked to a question bank or alternatively, refer to the guidance further below.
Video
▶️Link to video guidance for step by step instruction on how to Create a Question Group linked to a Question Bank
Instructional Text
◼️Create a Question Group linked to a Question Bank
You can then choose to set up question groups to allow you to place multiple questions within a group for students to answer. Creating a question group randomises or shuffles questions within a quiz (which is useful if you are using quizzes for continuous assessments within a specified time period).
🔗How do I create a quiz with a question group linked to a question bank?
Once you have set-up your quiz, don’t forget to Preview, before publishing as you can check how the questions are being pulled in from the groups.
NOTE: The linked guidance above points out the difference between Canvas Quiz engines (Classic Quizzes) and (New Quizzes), but please ignore this as we have Classic Quizzes only in QUB.
🔴There are 12 types of Quiz Questions available to use within Canvas. You can explore the full range of question types to keep your class tests and assessments more engaging and targeted to enhance your academic teaching and student learning. Watch the Canvas video below to learn the basics of creating quiz questions.
Video
▶️Link to overview video on Quiz Question Types in Canvas
Instructional Text
◼️Question Types
Step-by-step instructional guidance on how to create the variety of question types can be found via the Canvas Guides.
Browser and Computer requirements for Canvas
For best performance, Canvas should be used on the most recent release of Chrome, Firefox, Edge, or Safari. Because it’s built using web standards, Canvas runs on Windows, Mac, Linux, iOS, Android, or any other device with a modern web browser. Link to further information on supported browser and computer requirements for Canvas.

