Text mangling with Grep, Sed and Awk

Just an example for future reference of text mangling on unix/linux making use of sed, awk, and grep on a CSV/text file containing names, email addresses etc delimited with a semi-colon ;

cat emailaddresses.csv | grep “@” | awk -F “;” ‘{print $1}’ | sort | uniq | tr [:upper:] [:lower:] | sed ‘s/\@mydomain\.tld\.uk/\ $ main/’ | sed ‘s/\@/ \$ /’ | sed ‘s/^/mj_DLMembers= /’ > processed.txt

So we cat (read out) the contents of our text file ’emailaddresses.csv’ (which I exported from a xls file using Open Office). This is passed through grep so I only get lines which contain the ‘@’ symbol, so only lines containing email addresses – just in case there is a line with column names at the top. We then use awk to cut each of the columns based on the delimiter (; in this case) and ask awk to print out the first column (our email address column).
After that we sort the email addresses into alphabetical order and remove any duplicates using uniq.
The tr (translate) command is used to convert any uppercase characters to lowercase.
Next I have used sed to search (sed ‘s/findthis/replacewiththis/’) each line for the string ‘@mydomain.tld.uk’ (escaping the symbols @ and .) When sed finds a match it replaces it with ‘$ main’ which is what I need for my mailing list. For any other email address other than ‘@mydomain.tld.uk’ I just want to replace the @ symbol with $ so I use sed again for that.
I also need to prefix each line with  ‘mj_DLMembers= ‘ so I use sed again, this time finding the start of the line (^) and placing the text string ‘mj_DLMembers= ‘ in there.
Finally I direct (>) the results of this chain of pipes and commands to the file ‘processed.txt’ where I can use it for my mailing list.
Firefox Windows 7 and Linux proxy.pac

Had a problem today with Firefox on Windows 7 and Firefox on Linux. Upon reading our proxy.pac (wpad) file the if statements were not working:

if(isInNet(myIpAddress(), “123.111.123.0”,”255.255.254.0″))

According to this post on Mozilla the problem is due to how FF/Win7 reports the ipv6 address, rather than the ipv4 version. So the solution was to add the CIDR version too e.g.

isInNet(myIpAddress(), “123.111.123.0”, “255.255.254.0”) ||
isInNet(myIpAddress(), “123.111.123.0”, “/23”) || 

Order has been restored!

Red Hat CentOS Yum Repositories

This is my summary of Yum repositories for future reference. Yum (and apt on Debian systems) is an easy way to install software on Red Hat/CentOS systems and to keep those systems up-to-date. There are a variety of repositories with different software packages available which is why I like to use most of the following repositories. To install a new package with yum:

yum install packagename

To search for available packages

yum list php*

To update all packages on a system

yum update

For more info

man yum

Don’t forget you can install the yum-priorities package, then add priority=1 or priority=5 – any number to set a priority for the particluar repo. I usually set the centos ones to 1, rpmforge to 5 and the others to about 10.
CentOS
The main yum repositories are installed by default and you will find them at: /etc/yum.repos.d
They will be named CentOS-Base.repo and CentOS-Media.repo
Enable the sections you want in these files and set priority=1 as we prefer the well tested versions of software.

RPMForge
RPMforge has a wider range of packages available than the standard Red Hat/CentOS repositories including: clam, phpmyadmin
Installation instructions are at: http://www.rpmrepo.org/RPMforge/Using
Following these instructions for CentOS 5 64-bit we would install with:

su -c ‘rpm -Uvh http://packages.sw.be/rpmforge-release/rpmforge-release-0.5.1-1.el5.rf.x86_64.rpm’

Check the rpmforge.repo file is now in /etc/yum.repos.d and add a priority=5 line if you want.

EPEL
I used the EPEL repository at one point to get a specific PHP version which had not been released (and tested) on the other repositories and also a fairly specific scientific program. Installation instructions are at: http://fedoraproject.org/wiki/EPEL/FAQ#howtouse
For example for CentOS x86:

su -c ‘rpm -Uvh http://download.fedora.redhat.com/pub/epel/5/i386/epel-release-5-4.noarch.rpm’

REMI
I used the REMI repository at one point to get a specific
PHP version which had not been released (and tested) on the other
repositories . Installation
instructions are at: http://dev.antoinesolutions.com/remi-repository
For example for CentOS x86:

su -c ‘rpm -Uvh http://rpms.famillecollet.com/el5.i386/remi-release-5-6.el5.remi.noarch.rpm

Atomic ART
The Atomic repository has some extra packages mainly focused at servers running Plesk but I found the packages for OpenVAS on there that were not available on other repositories.
Download the following shell script:

wget http://atomicorp.com/installers/atomic

Make it executable and then run it.

chmod +x atomic && ./atomic

Answer the questions and you will have the atomic.repo file in /etc/yum.repos.d

Summary
For all these repositories it is worth checking the /etc/yum.repos.d/*.repo files for the following options:

  1. Enable the Repository
    Change enabled=0 to enabled=1
  2. Set priority for the Repository
    Add priority=3 to the end of the section

Using extra package repositories makes life easier for being notified of updates and installing new packages/updates, however if a package is not available or you need extra configuration you can always compile the traditional way ./configure make make install

Enhancing ClamAV with Extra Signatures

We use ClamAV mainly for scanning incoming email for malware and phishing scams. ClamAV comes with a default database usually stored in /var/clamav or /var/lib/clamav . To get up-to-date malware definitions the following sources can be used:

Freshclam
The Freshclam binary should have been installed when you installed clamd and you should have a script /etc/cron.daily/freshclam which runs daily to update the clam definitions. If not, you could run freshclam or add a cronjob with:

/usr/bin/freshclam –quiet –datadir=”/var/clamav” –daemon-notify=”/etc/clamd.conf”

ClamNailer
The definitions from ScamNailer are aimed at stopping Spear Phishing attacks. There are definitions for SpamAssassin and Clam. Set up a cronjob to retrieve the defintion at http://www.mailscanner.eu/scamnailer.ndb There is a download which includes a Perl script for this purpose and you can run it e.g. every 4 hours as follows:

33 1-23/4 * * * /path/to/ClamNailer-1.01.pl > /var/log/clamav-ClamNailer.log

ClamAV Unoffical Sigs
Download the Update script (and config file) from http://sourceforge.net/projects/unofficial-sigs/
Amend the configuration file /etc/clamav-unofficial-sigs.conf and set the ss_dbs variable to include all the sources you want to use (depending on how aggressive you want to be – we had a few false positives in jurlbla.ndb):

ss_dbs=”
   junk.ndb
   jurlbl.ndb
   INetMsg-SpamDomains-2w.ndb
   phish.ndb
   rogue.hdb
   sanesecurity.ftm
   scam.ndb
   spamimg.hdb
   winnow_malware.hdb
   winnow_malware_links.ndb
   lott.ndb
   spam.ldb
   spear.ndb
   winnow_phish_complete.ndb
” 

Then on the final line set:

user_configuration_complete=”yes”

Set up a cronjob to run the script:

/usr/local/bin/clamav-unofficial-sigs.sh -c /etc/clamav-unofficial-sigs.conf > /var/log/clamav-unofficial-sigs.log 2>&1

MSRBL
The MSRBL definitions are probably included in your clamav-unoffical-sigs script but can be run seperately if desired.
The MSRBL definitions can be used by running a shell script like the following, periodically as a cronjob:

#!/bin/bash
# Info at http://www.msrbl.com
PATH_TO_CLAM_DB=/var/clamav
rsync rsync://rsync.mirror.msrbl.com/msrbl/MSRBL-Images-FULL-SoN.hdb $PATH_TO_CLAM_DB/MSRBL-Images-FULL-SoN.hdb
rsync rsync://rsync.mirror.msrbl.com/msrbl/MSRBL-Images-3M-R-SoN.hdb $PATH_TO_CLAM_DB/MSRBL-Images-3M-R-SoN.hdb
rsync rsync://rsync.mirror.msrbl.com/msrbl/MSRBL-Images-1M-R-SoN.hdb $PATH_TO_CLAM_DB/MSRBL-Images-1M-R-SoN.hdb
rsync rsync://rsync.mirror.msrbl.com/msrbl/MSRBL-SPAM-CR.ndb $PATH_TO_CLAM_DB/MSRBL-SPAM-CR.ndb
rsync rsync://rsync.mirror.msrbl.com/msrbl/MSRBL-SPAM.ndb $PATH_TO_CLAM_DB/MSRBL-SPAM.ndb
/etc/init.d/clamd reload

The following example will run this every 3 hours:

18 1-23/3 * * * /path/to/clam-update-MSRBL.sh > /var/log/clam-update-MSRBL.log

Atomic
Atomic Secured Linux offers some 30-day old signatures freely (up-to-date signatures require a subscription)
Create a script to download the database from:

http://downloads.prometheus-group.com/delayed/clamav/clamav/ASL-h.ndb

An example script might be:

#!/bin/bash
cd /var/clamav
wget http://downloads.prometheus-group.com/delayed/clamav/clamav/ASL-h.ndb
/etc/init.d/clamd reload

Then schedule it as a cron job.

40 7 * * * /root/scripts/getAtomicClamDefinition.sh > /var/log/getAtomicClamDefinition.log

Refreshing ARP table entries

Taking an IP address down on one host:

/sbin/ifconfig eth0:1 down

Taking the IP address up on another host:

/sbin/ifconfig eth0:1 111.222.111.222 netmask 255.255.225.0 up

Use arping to update the ARP tables:

/sbin/arping -S 111.222.111.222 -B

So the switch should cache the new arp entry invalidating the existing one.
The arping utility appears to be part of the iputils package which should already be installed but if not:

yum install iputils

Centos Timezone

To set a timezone on Centos some Admins recomend a link such as

ln -s /usr/share/zoneinfo/Europe/London /etc/localtime

However some processes write to the localtime file and this can get corrupted so {counter-intuitively} its is better to copy the file to /etc. If the incorrect timezone persists try removing /etc/localtime it should then revert to UTC {GMT}. Also there appears to be a process synchronising the UK timezone files so if the London file gets corrupted so will the Belfast one. To repair copy a file from another system – but use London as copying and using Belfast will get overwritten again by the corrupted London file.

White-list Domain in ClamAV SaneSecurity Database

The SaneSecurity domain blacklist is held in the file INetMsg-SpamDomains-2w.ndb. In our case this is located in the /var/clamav directory. We can white-list troublesome domains by adding their signature to the local.ign2 file. The signature lines are of the form INetMsg.SpamDomain-2w.bad_domain – you can grep the exact signature from the ndb file. When you add a signature you should reload the clamd databases using the command: clamdscan –reload

Microsoft Entourage Setup on Mac OSX

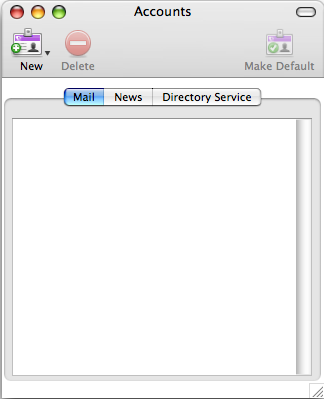
If you have not yet created any accounts the ‘Accounts’ dialog box (shown below) will open automatically when you lauch Entourage. If not choose it from Tools > Accounts.


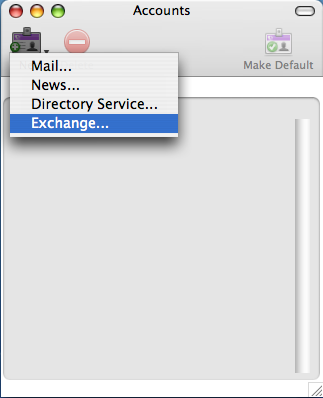
Click the ‘New’ button and select ‘Exchange’. (below)


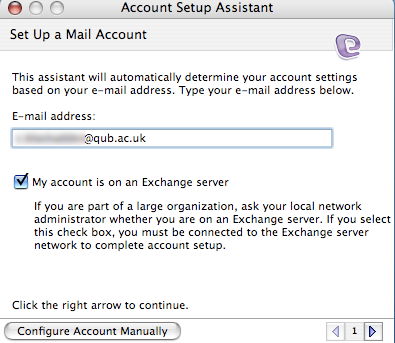
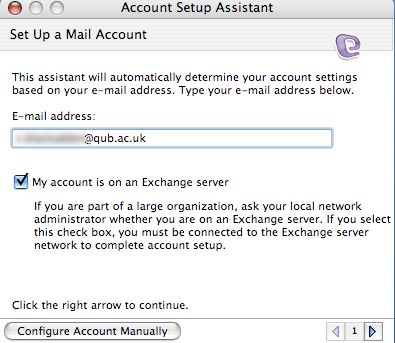
In the ‘Account Setup Assistant’ dialog box (shown below) type your email address and tick the ‘My account is on an Exchange server’ option then click the right arrow at the bottom to proceed to the next step.

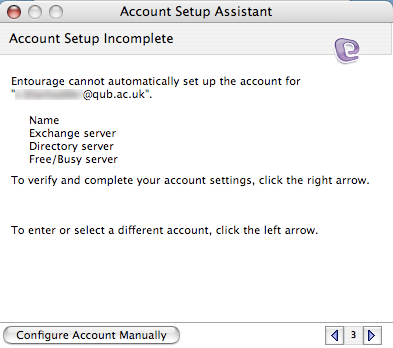
In the ‘Account Setup Assistant’ dialog box (shown below) click the right arrow button to proceed to the next step.


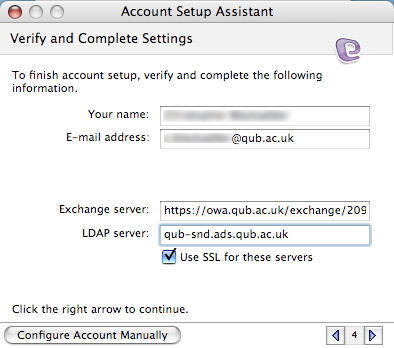
In step 4 of the ‘Account Setup Assistant’ dialog box (shown below) type your full name, your email address and Exchange server address:
https://owa.qub.ac.uk/exchange/123456@ads.qub.ac.uk
Substitute 123456 for your own staff number.
For the LDAP server address you can type: qub-snd.ads.qub.ac.uk
Click the right-arrow button at the bottom right to proceed to the next step.

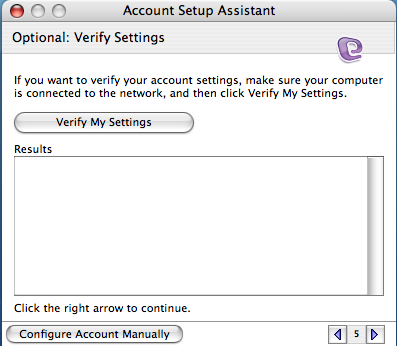
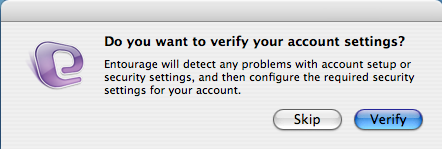
In step 5 of the ‘Account Setup Assistant’ dialog box (shown below) skip the verification and just click the right-arrow button at the bottom to proceed to the next step.

In the ‘Do you want to verify your account settings?’ dialog box click ‘Skip’

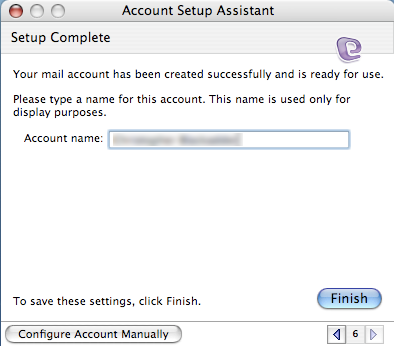
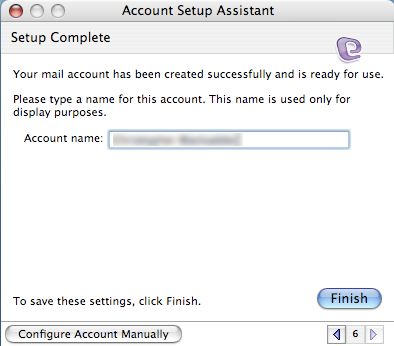
In step 6 of the ‘Account Setup Assistant’ dialog box (shown below) type a name to refer to this account e.g. your name. Then click ‘Finish’.

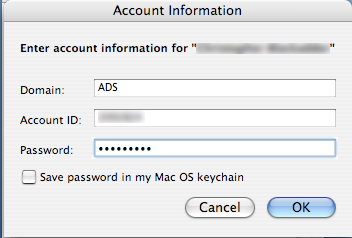
When asked for your QOL password enter it as follows (where the Account ID is your staff number) and click OK. The Domain is ADS.
You should now be able to use ‘Send and Receive’ and view email in your Inbox.

phpBB3 Permissions

We have had a few phpBB users struggling when creating new forums that disappear from view for normal users. Usually the forum permissions are the problem. In the Administrator Control Panel (ACP) click the ‘Forums’ tab, then ‘Forum Permissions’ as shown below:

A list of your forums appears, you may want to tick the ‘All forums’ tickbox then click submit:

In the next screen use the ‘Groups’ panel and tick the box for ‘Select all groups’ and ‘Edit permissions’ – this will allow you to view the permissions for all user groups to each forum.

You may notice that some groups do not have any roles assigned. This is the default for security, however if you want anonymous users (Guests) to be able to view the topics in each forum you will need to change the permission from ‘No role assigned…’ to ‘Read Only Access’:

Similarly you should also set Newly Registered Users to ‘Standard Access’ otherwise their first few posts will have to be moderated before appearing in the forum.

certwatch

Certwatch checks for Apache certificates which are due to expire. By default on Red Hat / Centos there is a cron job in /etc/cron.daily which runs and sends its output to root. To configure it:

vi /etc/sysconfig/httpd

Add a line such as:

CERTWATCH_OPTS=”–period 30 –address my.user@domain.tld”

It is also possible to switch it off with:

NOCERTWATCH=yes